Monday, 10 November 2014

Perfectly imperfect!


Hello all,  With the summer heat easing it's time to get back into perfecting my corner of the universe.  I was trolling the oracle / internet and came across a project I had to try.  It seemed too easy and too fabby not to give it a try.  It was a small garden stool made of concrete. Recently I have become obsessed with cement -  the versatility,  the ease of mix and go, the rough texture, muted colour and the low cost factor.  My love of a good bargain is second only to my love of FREE :)

So... I gave it a go.  I  purchased a small $2 bag of quickcrete and dragged it home ripped it open and began the process right in my kitchen.  I have no restraint once on the project trail...  oh well, I guess there are worse vices!  I  grabbed a 5 gallon bucket from my basement and a dowel (2 old broom handles  would work just fine) and took them into the kitchen.    I had to cut the dowels into (4) 18 inch pieces -- they would soon be the legs.   I cut the  bucket down to 9 inches high,  this allows the legs to splay out a bit and not stand straight up.  Cutting the bucket was the hardest part, I used an old carpet knife.


Next I  took out my measuring cup and put 4 cups of water in the measuring cup-- it just looked like the right amount.   Little by little I added the water to the cement and mixed it like cake batter -- started with a well in the centre and  worked to the outside.  A bit of a joke that because I haven't baked a cake in many many a year! But I knew not to over water and to fixate on a thick heavy mixture, like if peanut butter were cake mixture!  Once it looked right I gripped the bucket and banged the entire thing on the counter a few times to smooth it out and get rid of  the air bubbles.

Next I determined which ends of the dowels were  the best, the factory cut ones, not mine :)   I marked them, they would be the bit on the floor.  Next I measured 1 1/2 inches on each stick.  I wanted all four to be in the mix evenly.  then I stuck them in,  not too close to the edge so as to show through.   I prayed  they were perfectly placed :)  You could measure - set up a quadrant etc etc  but who does that???  Finally I left it on the counter to cure  / dry overnight.


HERE is the most important bit.  When cleaning up DO NOT wash your stuff in the sink- kitchen or otherwise.  Liquid concrete dries hard, even under water!  Think many, many dollars in ruined piping :(  Don't even wash your hands  in the sink, use another bucket and discard the sluice / juice safely.

Up at the crack o' dawn, I dashed to the kitchen to check it out.  It had hardened nicely.  Getting it out of the bucket wasn't too hard but it didn't slip out either!  I tapped it with my rubber mallet right the way around and tugged at the legs.   It came out - the bucket cracked a bit - but hey!  my stool was perfectly imperfect!  A few areas where the concrete didn't stick but round, smooth and grey!


I flipped it over and quickly sat on it - don't do this!    Why? The concrete isn't really dry and it could crack -- mine didn't.  It wobbled a bit, but I was undeterred, not taking it as a weigh thing.   I  found some old black rubber feet I had purchased for something else and put them on the bottom.  On the shorter one (because alas it wasn't even!) I added some filler to make up the difference and Voila!!!

 When showing it off to a friend she suggested stripes on the legs.  Yes I thought-- STRIPES!  Think hamburgler, think candycanes! But then I realised that that bit of decor should have happened before the legs were attached - save that for stool number 2! 'm now thinking mosaic! I fixed my thoughts on filling containers of all shapes - this was just the beginning -- yay  a new obsession!!! 

Anyway here it is.  My perfectly imperfect stool!


Tool Diva


Saturday, 25 January 2014

Basket of love!!!!

Hello and a late happy new year to all!

I was given a fabby crate of wine for Christmas by some wonderful friends.  The wine is (and was!) delicious... but the box made my heart beat faster...

I envisioned all sort of wonderful things that I could do with it and today I made that come true!!!!

As we emerge from the January dry spell into Valentine's day, this particular  project seems especially fitting.  Back to loving life, with a glass of wine in hand!  Plus it was very inexpensive (who the heck has any spare $$$ after Christmas?) ... and very easy!  It's one of those projects that once finished, will  give you years of joy and be the envy of all of your friends who squandered $100+ on picnic baskets!!! Look at my new (practically free) beauty!


The finished product!!!!


Details...
First I cut an old atlas so that the maps fit the bottom of the crate and put that aside. Then I stained it a brown colour...reminiscent of old steamer trunks and cigars - yum!  Took about 5 minutes, and maybe 10 or 15 to dry enough to continue. Next I added some hardware, 4 corners on the bottom, 2 decorative hasps (the suitcase closure thingys) and a few upholstery tacks.

The big brass kind that you usually see on Art Deco furniture.  That investment cost me less than $20 at the local hardware store.  The hasps came with the tiniest nails, too delicate for me, so I substituted the tacks.  I thought it gave it a more substantial look.

For the strap I used an old old purse strap, I had a 30+ year old second hand, gifted to me,  coach leather  bag  (thanks Pat!) that probably originally sold with a matching saddle... :) it was well worn and perfect for this. With the holes already punched in it I used them as guides and staple gunned the handle to the box.  I stapled on top of the holes and used more upholstery tacks to hide the staples. I did this for  sturdiness, cause my picnic box is likely to carry enough food for four and an equivalent amount of wine :)
Now the interior...

I took the  atlas pages and brushed them with a tea solution to 'age' then, next I mod podged / glued them to the bottom of the crate.  I will eventually put a thin coat of urethane on it to seal it against food spills.  But
today is not that day. I couldn't wait to finish it!

Finally I assembled the beauty.  1 round white table cloth, 2 bottles of wine, 3 small plates, corkscrew, candles, matches, wine plugs ( like there will be some left over???!!!??!!) cutlery, cutting board, wine glasses, small vase for flowers,  yummy cheeses and napkins.


Good to go!  I'm thinking you could make one for you and your squeeze in about 2 hours once you have the bits and pieces.   Beautiful, elegant and totally fitting for that special occasion or for solitary trips to the beach with a good book mmmmmm :)

All this for less than $20 -- almost too good to be true!


Tool Diva
Xx


Tuesday, 29 October 2013

Sexy legs and a stylin' formica redo

Hello everybody!  I have been really busy with too many open projects and too few hours, but here is one that has been completed and that I am entirely pleased with.  Pleased because it looks great and it cost me about $250 of fresh cash! I had a few bits and pieces already so I don't count them in because either they were free or I purchased them more than a year ago.

Ignore me in the background!
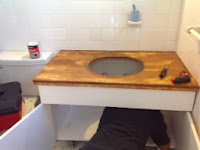
My daughter's bathroom was a bit sorry looking.  Kinda unfortunate because I hadn't allocated any money or time to upgrading her bathroom as other items seemed to demand priority.  Well that bit me in the old cheeks when I went into her sink cabinet to get some nail polish remover (my toes were looking really sad too, ah the end of summer - but I digress!). I discovered that the metal pipes were so corroded I could push my finger through them.  I didn't  push my finger in - but I did adjust my priority listing.  Here is her bathroom... note the faux marble formica  top and the  'used to be trendy' clear plastic faucet covers.  What you don't see is the rusted shower curtain pole and dated light fixture above sink.  Hey - we all have to make sacrifices :)

My original thinking was to only replace the pipe -- but that came with problems.  I ended up having to remove the taps and the sink to get to everything.  So by the time the pipes and the cabinet were off the wall and the sink in pieces I had to concede that it was a perfect opportunity to surprise her with a  stylin', but  budget conscious upgrade.  I went to look at new vanities ( $600+ ouch!).  Truth is a new vanity would stand out like a sore thumb and hers was a custom size (41inches), so a standard top wasn't going to fit either.  Can you hear cha ching???

A friend came over while I was in the pipe replacement mode and together we nodded our heads on the escalation of the project into 'operation bathroom redo'!   New taps, new light fixture (already had one), new shower curtain rod, new counter top (still formica, but the updated version!)   I chose a brushed gun metal finish.  The oracle was consulted, how do you replace formica?   Don't you just love YouTube university!?!  Yup, not hard but requires a special tool -- a router --  so we borrowed one.  The bonus add in -- to up the styling quotient --was the cast iron bath tub feet added to the cabinet instead of ordinary legs!  I had purchased a set of 4 about 18 months ago on a trip to Nova Scotia at a place called renovators-resource. I just had to have them-- I knew they would come in handy - yaaaay!
Ok, so we used a screwdriver, my drill, a special cutting blade to cut the formica along with my jig saw,  the specialised laminate glue and silicone to water proof the top where it met the walls.  The plumbing required wrenches, plumbers tape and putty and of course
 new PVC pipes.   The router was used to smooth the edges of the
formica so that you didn't get uneven rough seams.

Replacing the taps was pretty easy.  Off with the old and on with the new + a bit of plumbers putty  (It's like plasticine or playdoh you roll little snakes and flatten them out and press in place.)  Connecting the drain - once the instructions were followed worked well.  We used the existing hole in the plywood surface to trace and cut (jig saw) the sink hole in the formica and carefully measured the actual size of the rectangular cabinet top.  The jig saw cut was rough but it didn't matter because that bit would be under the sink.  On the straight edges we used the specialised tool to score and snap it apart.

The legs!  Well, the feet were actually taller than the existing legs and caused us to have to make adjustments.   Nothing is without consequences! Like lengthening the piping (pipe extension needed) and the tubing that connects the water to the taps and drilling new holes (masonary drill bit)  in the tile wall to attach the sink cabinet to.  But hey it was worth it!

Admittedly I didn't work with the electricals -- those bits scare me somewhat.  It did involve buying a white circular cover to hide the hole left by the other light fixture.  Fortunately that's a common problem and they have an application for that!

With the addition of the new shower rod we were done!  I added some silver decor items to glam it up and Dom dum dum dum!   Ok, I can't sing but who cares, you get the picture!


silver spray job
Moral of the story... don't let old pipes prevent you from revealing your sexy legs!

TD

Rough and ready -- chair envy

It's rained for weeks - mud city!
So the other day a pair of free chairs came my way. (Thanks Lynn!)  They were wrought iron swivel type bar height stools.  Rusty and with almost no seat cushions left.  I was in love!  I imagined them sanded down with new seats placed next to my iron maiden and my ottoman.

The trouble was, I didn't have any fabby fabric to set them up with.  Who wants to pay 50$ a yard for fabric? -- I wanted a free solution to materialise :)  after all free stuff shouldn't cost you money!!!! I had to think fast, I was too eager to get started on them so had to take extreme care not to go near a fabric store.  Then the idea came...   Burlap, I love the look of it-- it is rough and yummy all at the same time, AND I knew where it was free (favourite word again!)  for the asking!!!  My neighbourhood - roast their own - coffee shop.  Thank you Rock Island Coffee!

I snagged 2 empty coffee bags just for the asking.  One said Guatemala, one just had the weight and type of bean on the front.  They were perfect!  I decided to not use the printed side - cause they didn't match :(   But first things first.  I sanded the chairs down using my sanding block, so much easier than using paper.  Soon they were smooth and ready.

I dismantled the seats, turns out the pressed fibre board was in shreds, had to be thrown out.  No matter, I had some ends of 1/2 inch or so plywood and traced the shape and took my jig saw and cut out the bottoms.  The foam was in reasonable shape so I kept that.  Because there was no fabric cover to trace, I had to make my own pattern.


technical stuff!
I took the board, placed it on the burlap and took the next handiest measuring tool I had -- a nail file -- and used it to make the pattern. (Hey, I didn't go to school for this stuff, I make it up and use what I have!)  I made a mark on the nail file and measured out from the edge of the wood and traced a shape about 4 inches bigger than the stool.   Then just to be extra sure I cut  the burlap an inch bigger than my pattern.  The little voice in my head said you can work with too big, but who can tolerate too small!  Turns out it was a good call.  I needed the extra.  Science sm-ience ha!

I put them together, it worked.  I took extra care to get the corners tight -- that's the difference between an amateur job and a snazzy one!  BUT ... OH NO...  I loaned my industrial staple gun to a friend who had just gone away and would be gone for 2 weeks.  Who has time for that!! I needed my gun.  In my fervor I used push pins (readily available)  I just needed to see them together.  The corners slackened. But I got the gist.  On a practical level I added some stick-on pads to the bottom of the stool legs, I hate the sound of metal scraping the floor.  Now to add the wow factor... 

In my craft / junk/ floral  workroom I have a bin of fabric samples.  Last Christmas I made a tree of floral rosettes using some tweedy fabric samples.  Perfect!  I stripped the tree and re-purposed the rosettes.  Yes!  the wow factor I was looking for.

Love!
Even though they aren't finished  'cause my friend won't return for at least another week,  I assembled them for a picture to show you.  I can't wait on stuff like that.  I'm the type of girl that forces people to open their  Christmas gifts early - so to tame the urge, I shop on Christmas eve. Oh well, we all have our faults.

A friend commented on the chairs "do you think they'll be itchy??" My response?  Hell yes, keep your pants on!   Sometimes beauty comes at a cost!


TD


Wednesday, 25 September 2013

Fall into Christmas-- outdoor decor for the cheap and chic :)

I know, I know, people hate the mention of Christmas before Halloween (my other favourite time of year), but sometimes you need to plan in order to get the best deal and really max it out!    SO... that said, I have created a Christmas project I want to share -  tell me what you think :)

Its called a flower tower.  I saw this on Pinterest and immediately fell in love.  The colours are perfect for Fall and will appear Christmas-y when the time comes :D Even if my coleus isn't red!


BUT...60+ seedlings are a bit pricey, especially if you want the "grand mama/ mac daddy" version - and I do! So I set about 40+ cuttings from my own garden in water and waited until they rooted. (See, this stuff takes time.) I gathered some chicken wire, wire cutters, small zip/cable ties, soil, a length of PVC pipe, my drill and a clay pot.


I mostly followed their directions -- except I didn't have the type of wire they required and used chicken wire instead, which was in a roll in my basement. Needless to say the ultra sturdy chicken wire caused some problems (cutting this stuff is hard!) but I think I solved them... (band aids and gloves!) The original instructions are here. But basically you line the wire with landscape fabric, the kind that keeps the weeds out. Form the wire into a circle so it fits in the pot, cut to size, secure the circle with the ties and add soil. Water half way to pack the soil down. Fill to top. Insert pipe*. Then poke small holes through the wire and fabric and insert the plants. BINGO!, Bob's your uncle, and all that jazz - ok enough cliches, you get the point!

I made another small modification to the project because my tower is a big tower! I added a PVC pipe down the centre of the pot with about 20 holes drilled in random spots along the pipe. Ann's suggestion... better watering -- its still hot outside, can't let the babies dry out. 
Insert plants into the holes


I'm at the hurry up and wait stage, as its catching itself.  Soon I will shape it  into the pyramid shape, it will be lush and beautiful -- better than the  Pinterest one because I spent 0.00 $ on the plants. Nada/ zip/ nothing!!!  Come Christmas you'll wish you had been more forward thinking-- in September!  Note: coleus gets stronger colours if put in direct sun.. but wait until its fully caught before putting in direct sun- don't want to kill the babies! 


Looking a bit droopy at first!


Here it is a few days later looking much perkier!


As an aside, I'm going to demonstrate this project at Gorham's on October 5th, come and see how much better it looks after a little time!


Merry September!
TD


Friday, 23 August 2013

Cork obsession

A while back my daughter started collecting corks.  She collected thousands of them!  Sadly she revealed this obsession to the entire school when they asked for a small profile on each girl.  Most of the other girls rabbited on about American Girls or some other inane endeavour.  My proud daughter was into corks AND seemed to have an endless supply. The parents at the assembly appeared somewhat disapproving, oh well...


Like the good mother I am, I took those corks and decided to give them a high profile space in our home :) I had a small closet about 3' x 3', located just before the door to the patio -- just sitting empty.  I figured those precious corks would make good 'wall paper' for my new wet bar / wine closet.  I scored some free -- (Don't you just love that word?  Free!!) -- authentic wine cellar racking from a restaurant that was upgrading their cellars so I knew I could pull it off.


Here was the plan... I needed my skill saw, a hot glue gun, a hammer and some nails - pretty simple stuff!


A few sticking out to hold openers 'n stuff


See the shelves & fridge below
A friend popped by as I was working and helped me cut the racking to fit above the existing shelf in the closet and secure it with a few screws.  Next I began gluing corks to the walls using an alternating herringbone type pattern. I tried initially to match corks but I gave that matching thing up!  I glued thousands onto the walls - that took forever!!!!!!  If nothing else, I am a dedicated mother! I did it in stages, using the space as I went along gluing. I have to admit to needing to supplement her collection and went begging to my wine loving friends.

Brads up through centre of corks
ceiling view
I decided to use champagne corks to decorate the ceiling and to hold a few wine glasses.  I hammered brads into the centre of the champagne corks to secure the glass holders (brads = skinny nails about an inch+ long).  No point breaking the glasses. Then I added a mini fridge below the existing shelf to store beer, sodas, etc.

Lastly, (can I get an AMEN!) I added a few personal touches like an old school metal coca-cola bottle opener, ice buckets, coasters, stir sticks, some fabulously tacky paper drink umbrellas and of course, the wine :)
A good friend found this special cork (Burgess Cellars) and made this  shadow box for the door of my wet bar/ wine closet.  Perfect!  Who knew my family had cellar(s) ?!  Thirst, be gone!

Cheers!  what do you think?

TD

Thursday, 22 August 2013

lady in waiting (warning no tools used on this beauty!)

Earlier this summer I was at a pop up show event and and spotted a wire framed woman's corset.  It was just like the ones dressmakers / tailors would have used except wire.  It was love at first sight -- I had to have it.

my wire lady :)
I had dreams of beautiful flowers trailing out of it  and designing the entire outfit with plant material.  My teeth were sweating at the prospect.  I walked by it and stared  a dozen times, praying no one else would buy it.  NO one did, not even me.  The shop closed down  :(

But because I believe that if you picture it and wish hard enough, it will eventually come true -- I got it!  The shop reopened and had a sale on items left over!  My lady was waiting there for me Yayyyyyy!

I seized her and dragged the life sized form to my carruck.  An older couple looked on curiously, perhaps my fervor was seeping out?!  They asked what I  was planning to do with "that wire thing".   Grrrrrr.  Some people - the kill joy types - have no vision.  I pictured roses trailing from  the hem, I could almost smell them I was sooo caught up,  only  to have those people momentarily enter my reverie with that sour, pinched face, eyebrows at the hairline look, as if they smelled something bad.

I composed my face, remembering my school girl manners "Good afternoon!" I  crowed proudly,  "I will have flowers and the like trailing from it, it will be a garden decoration"  I chirped.

"Oh... well, I suppose we hadn't though of that... we couldn't imagine what on earth you would want that for,"  they replied smugly.  Grrrr... Forget them, fast forward, I have it at home.

First I run to my unkempt Chinese fan palm tree and grab all the mesh that I can put my hands on.  I will need quite a bit to create the dress and to hold the soil inside.  Luckily there was loads of material for me to use.  I stuffed it inside, creating a brown dress.

miniature wandering Jew
Next stop the lower garden where I had planted some form of miniature wandering Jew, hoping that it would  make a good ground cover - it didn't.  But like most invasive type plants it had spread like crazy (something else to address later :s )  Anyway for now it was a delicate almost lacy, purple and green leaf.  Just right for the interim period it will take to get those roses to materialise.

I  poured soil in the inside using the mesh as a make shift planter and poked the plants into it along the bottom.  In the top I put two small pots filled with the wandering Jew plants.

Perfect, easy and very pretty.    I purchased a few trailing roses and set them aside.  These will take months to do what I want  them to do and besides,  it's August...   Now I just have to spritz regularly and enjoy-- hopefully next spring when the roses are trailing I will see that couple again.  I will carry a picture with me, just in case!  I bet they'll wish they had found her first.  I bet they won't have that pinched face look at all .. HA! all mine :)

Hang in there - it will be beautiful, you'll see :)

TD